

กลุ่มสาระการเรียนรู้การงานอาชีพและเทคโนโลยี วิชา เทคโนโลยีสารสนเทศและการสื่อสาร ม.3 isbn 9786163172419 |
จุดประสงค์การสอน
1. เพื่อให้เข้าใจกระบวนการพัฒนาโปรแกรมเชิงวัตถุโดยใช้ไอดีอี 2. เพื่อให้มีทักษะในการพัฒนาโปรแกรมที่มีส่วนติดต่อกับผู้ใช้แบบกราฟิก IDE = Integrated Development Environment OOP = Object-Oriented Programming GUI = Graphic User Interface กระบวนการพัฒนาโปรแกรม 1. ดาวน์โหลดโปรแกรมจาก http://www.icsharpcode.net/OpenSource/SD/Download/ แล้วติดตั้ง 2. เปิดโปรแกรมแล้วสั่ง New solution แบบ Windows Application แล้วตั้งชื่อ Solution 3. เปิด MainForm.cs แบบ Design เพื่อเข้าจัดการ Form 4. ลากวัตถุ ปุ่มคำสั่ง (Button) จากกล่องเครื่องมือ (Tool Box) ไปวางใน Form และ ลากวัตถุ กล่องข้อความ (Textbox) จากกล่องเครื่องมือ (Tool Box) ไปวางใน Form และ กำหนด คุณสมบัติ (Properties) แต่ละวัตถุตามต้องการ เช่น สี และตำแหน่ง 5. ดับเบิ้ลคลิ๊กที่ปุ่มคำสั่ง เพื่อใส่เหตุการณ์ แล้วพิมพ์คำสั่งระหว่าง { และ } เช่น textBox1.Text = "hello" 6. สั่ง Project > Run Project เพื่อให้มีการประมวลผล หรือเปิดการทำงานของฟอร์ม 7. สั่ง File > Save All แล้วปิดโปรแกรมทั้งหมด ถ้าเปิดใหม่ก็เลือกแฟ้มที่นามสกุล [ชื่อโปรเจค].sln ขึ้นมา 8. ในห้อง /bin/debug จะมีแฟ้ม [ชื่อโปรเจค].exe ที่นำไปใช้งานได้ 
ผลวิจัย การพัฒนาแบบฝึกทักษะฯ สำหรับนักเรียน ม.3 โดย นางพัชรสุดา อ่างมณี บทเรียน และแบบฝึกหัดการออกแบบส่วนติดต่อกับผู้ใช้ โดย นางพัชรสุดา อ่างมณี |
![[ชื่อโปรเจค].sln](http://www.thaiall.com/csharp/sharpdevelop/mycal_11.png)
 |
คำอธิบายจอภาพที่ 1 - แนะนำโปรแกรมชื่อ Sharpdevelop ไปค้นใน google แล้ว download - ในที่นี้มีรุ่น 5 ซึ่งใช้ได้บน win8 ถ้าเป็น win7 ก็ให้ใช้รุ่น 3.2 - เมื่อได้มาแล้วก็ติดตั้งให้เรียบร้อย |
 |
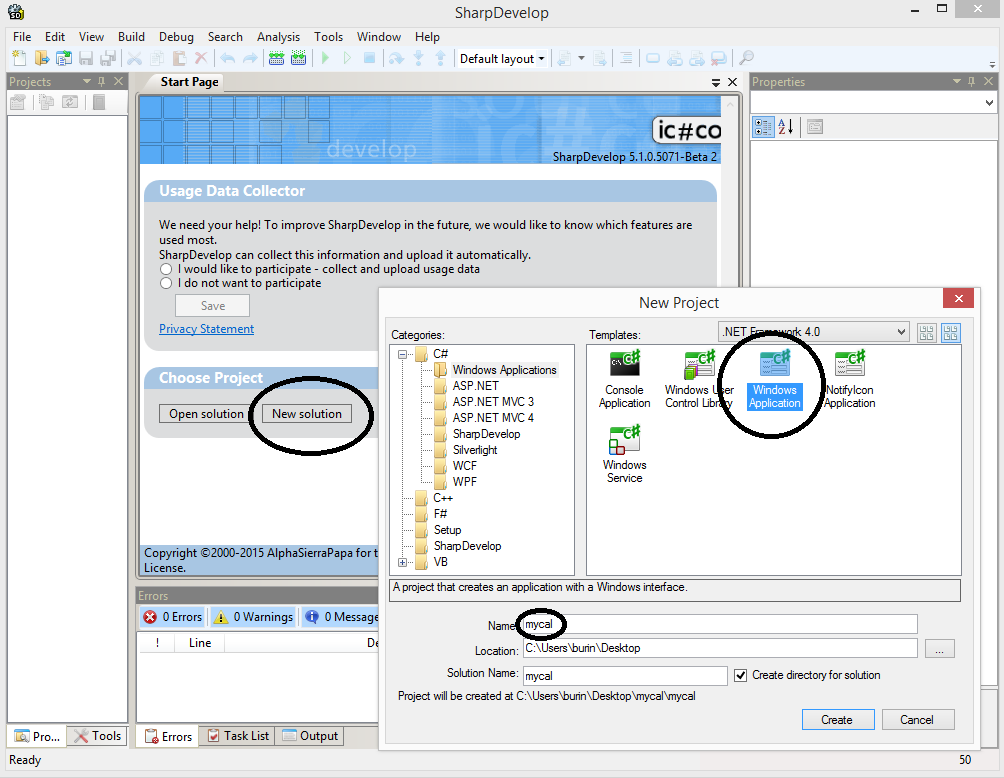
คำอธิบายจอภาพที่ 2 - หลังติดตั้งก็เปิดโปรแกรม เลือก New solution - แล้วเลือก C# และ Windows Application - ในช่อง Name และ Location ระบุชื่อโปรแกรม และห้องที่จะจัดเก็บแฟ้มผลงาน |
 |
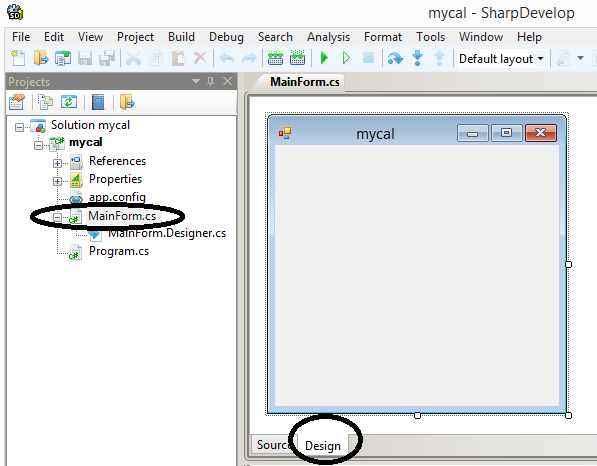
คำอธิบายจอภาพที่ 3 - ในกล่อง Project คลิ๊กที่ MainForm.cs - เลือก Design แทน Source จะได้ใช้เทคนิคลากวางได้ |
 |
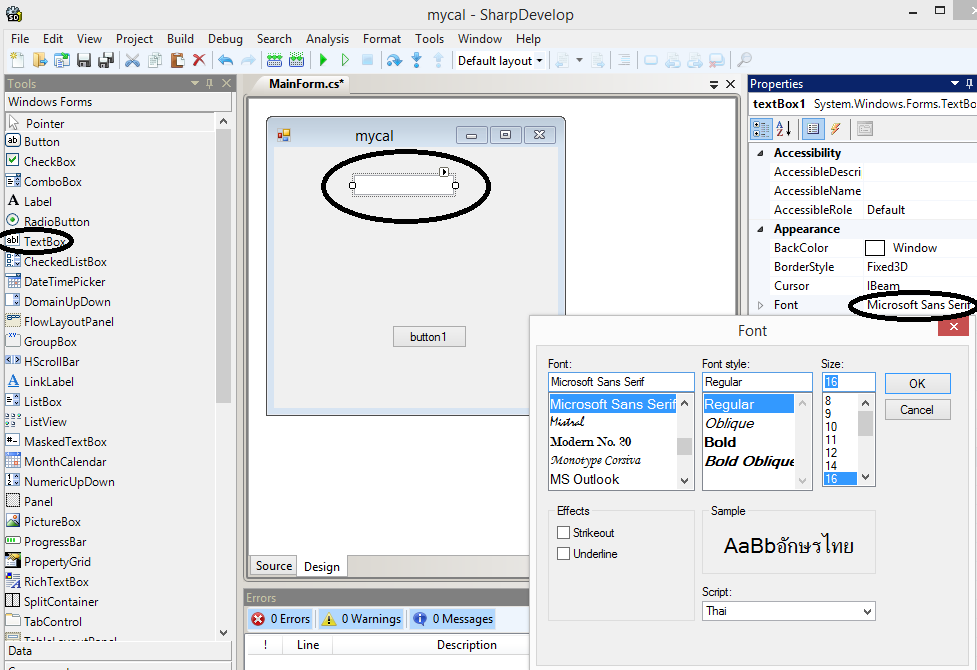
คำอธิบายจอภาพที่ 4 - ด้านซ้ายจะมี Tools ที่ใช้สำหรับออกแบบ Form - คลิ๊กที่ Button ค้างไว้ แล้วลากมาวางไว้ใน Form - คลิ๊กที่ TextBox ค้างไว้ แล้วลากมาวางไว้ใน Form - Properties ของ TextBox สามารถเปลี่ยนขนาดตัวอักษรได้ |
 |
คำอธิบายจอภาพที่ 5 - ลาก Button และ TextBox มาไว้บน Form ดังภาพ - ภาพที่เห็นจะมีปุ่มต่าง ๆ เตรียมไว้ทำเครื่องคิดเลขอย่างง่าย |
 |
คำอธิบายจอภาพที่ 6 - เปลี่ยนข้อความบนปุ่มให้เป็นตัวเลข 0 - 9 - และมีเครื่องหมายทางคณิตศาสตร์ บวก ลบ คูณ หาร - ปรับขนาดให้ได้สัดส่วนสวยงาม |
 |
คำอธิบายจอภาพที่ 7 - คลิ๊ปไปที่ปุ่ม จะเข้าส่วน Source ของ MainForm.cs - คลิ๊ปที่ปุ่มเลข 7 ก็จะใส่เหตุการณ์ หรือรายละเอียด Method ของปุ่ม เช่น void Button4Click(object sender, EventArgs e) { textBox1.Text = textBox1.Text + "7" } - ถ้าใส่เหตุการณ์ในปุ่มแล้ว เมื่อกดปุ่ม Run กดเลขใด ก็จะไปแสดงใน TextBox - ถึงตรงนี้ให้ระวังเรื่องอักษรพิมพ์ใหญ่ หรือพิมพ์เล็ก มีความหมาย และทำให้โปรแกรมผิดได้ |
 |
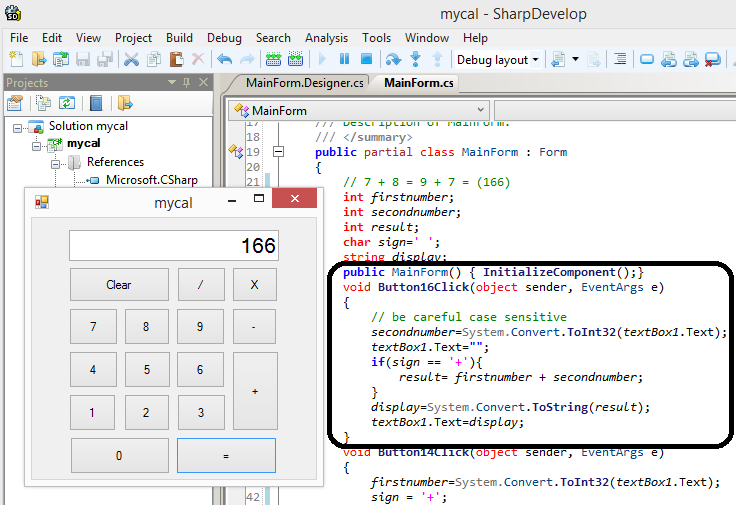
คำอธิบายจอภาพที่ 8 - ใต้ MainForm ประกาศตัวแปร firstnumber, secondnumber, result, sign และ display - ใส่เหตุการณ์ในปุ่มบวก มีเหตุการณ์ให้กระทำ 3 เหตุการณ์ firstnumber = System.Convert.ToInt32(textBox1.Text); sign = '+'; textBox1.Text = ""; |
 |
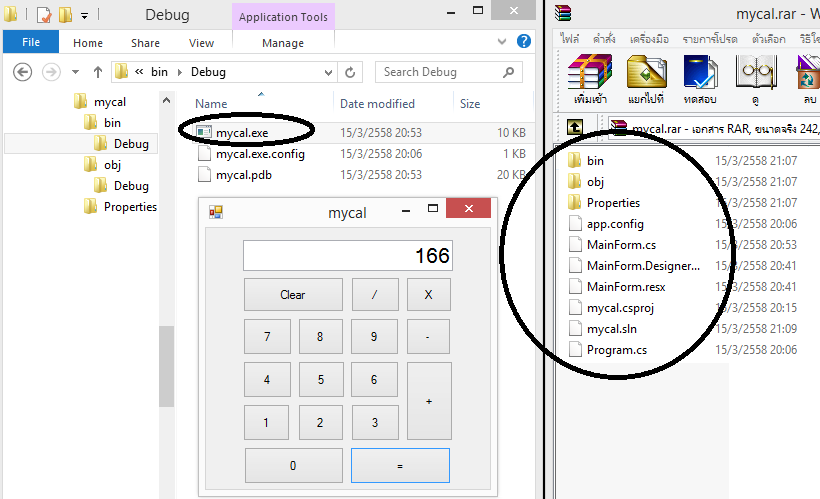
คำอธิบายจอภาพที่ 9 - ใส่เหตุการณ์ในปุ่มเท่ากับ ตัวอย่างนี้รองรับเฉพาะการบวก มี 7 เหตุการณ์ secondnumber = System.Convert.ToInt32(textBox1.Text); textBox1.Text = ""; if(sign == '+') { result = firstnumber + secondnumber; } display = System.Convert.ToString(result); textBox1.Text=display; - กดปุ่ม run แล้วลองทดสอบพิมพ์ 7+8=9+7 ผลที่ได้จะเป็น 166 |
 |
คำอธิบายจอภาพที่ 10 - ถ้าทดสอบ และ Save ทั้งหมด จะมีแฟ้มอยู่ในห้องที่กำหนดไว้แต่แรก - ห้อง mycal/bin/Debug มีแฟ้ม mycal.exe ที่นำไปใช้งานได้เลย - ห้อง mycal ก็จะมี 3 folder และอีก 7 แฟ้ม - แฟ้ม mycal.sln คือแฟ้ม solution ที่ใช้เปิดแฟ้มทั้งหมด หากต้องการแก้ไขงานในภายหลัง |
 |
คำอธิบายจอภาพที่ 11 - เปิดโปรแกรม Sharpdevelop ขึ้นมาใหม่ - เลือก Open solution แล้วไปเปิด folder ที่เคยเก็บงานไว้ - จะพบแฟ้ม mycal.sln ให้เลือกแฟ้มนี้ เพื่อเปิดงานเดิมมาแก้ไข |
 |
คำอธิบายจอภาพที่ 12 - ถ้าหากคัดลอกห้อง mycal ไปไว้เครื่องอื่นก็สามารถทำได้ - เมื่อใช้ Open solution เปิด mycal.sln ก็จะแก้ไขและสั่ง run ได้เหมือนครั้งที่เริ่มต้นเขียน |